PSModuleTemplate
A template repository for creating PowerShell modules with built-in CI/CD, testing, and best practices.
About
PSModuleTemplate provides a standardized structure for developing PowerShell modules with automated testing, building, and deployment workflows. Use this template to quickly bootstrap new PowerShell module projects with industry-standard tooling and practices.
Pipeline Architecture
The CI/CD pipeline is split across three workflows triggered at different stages.
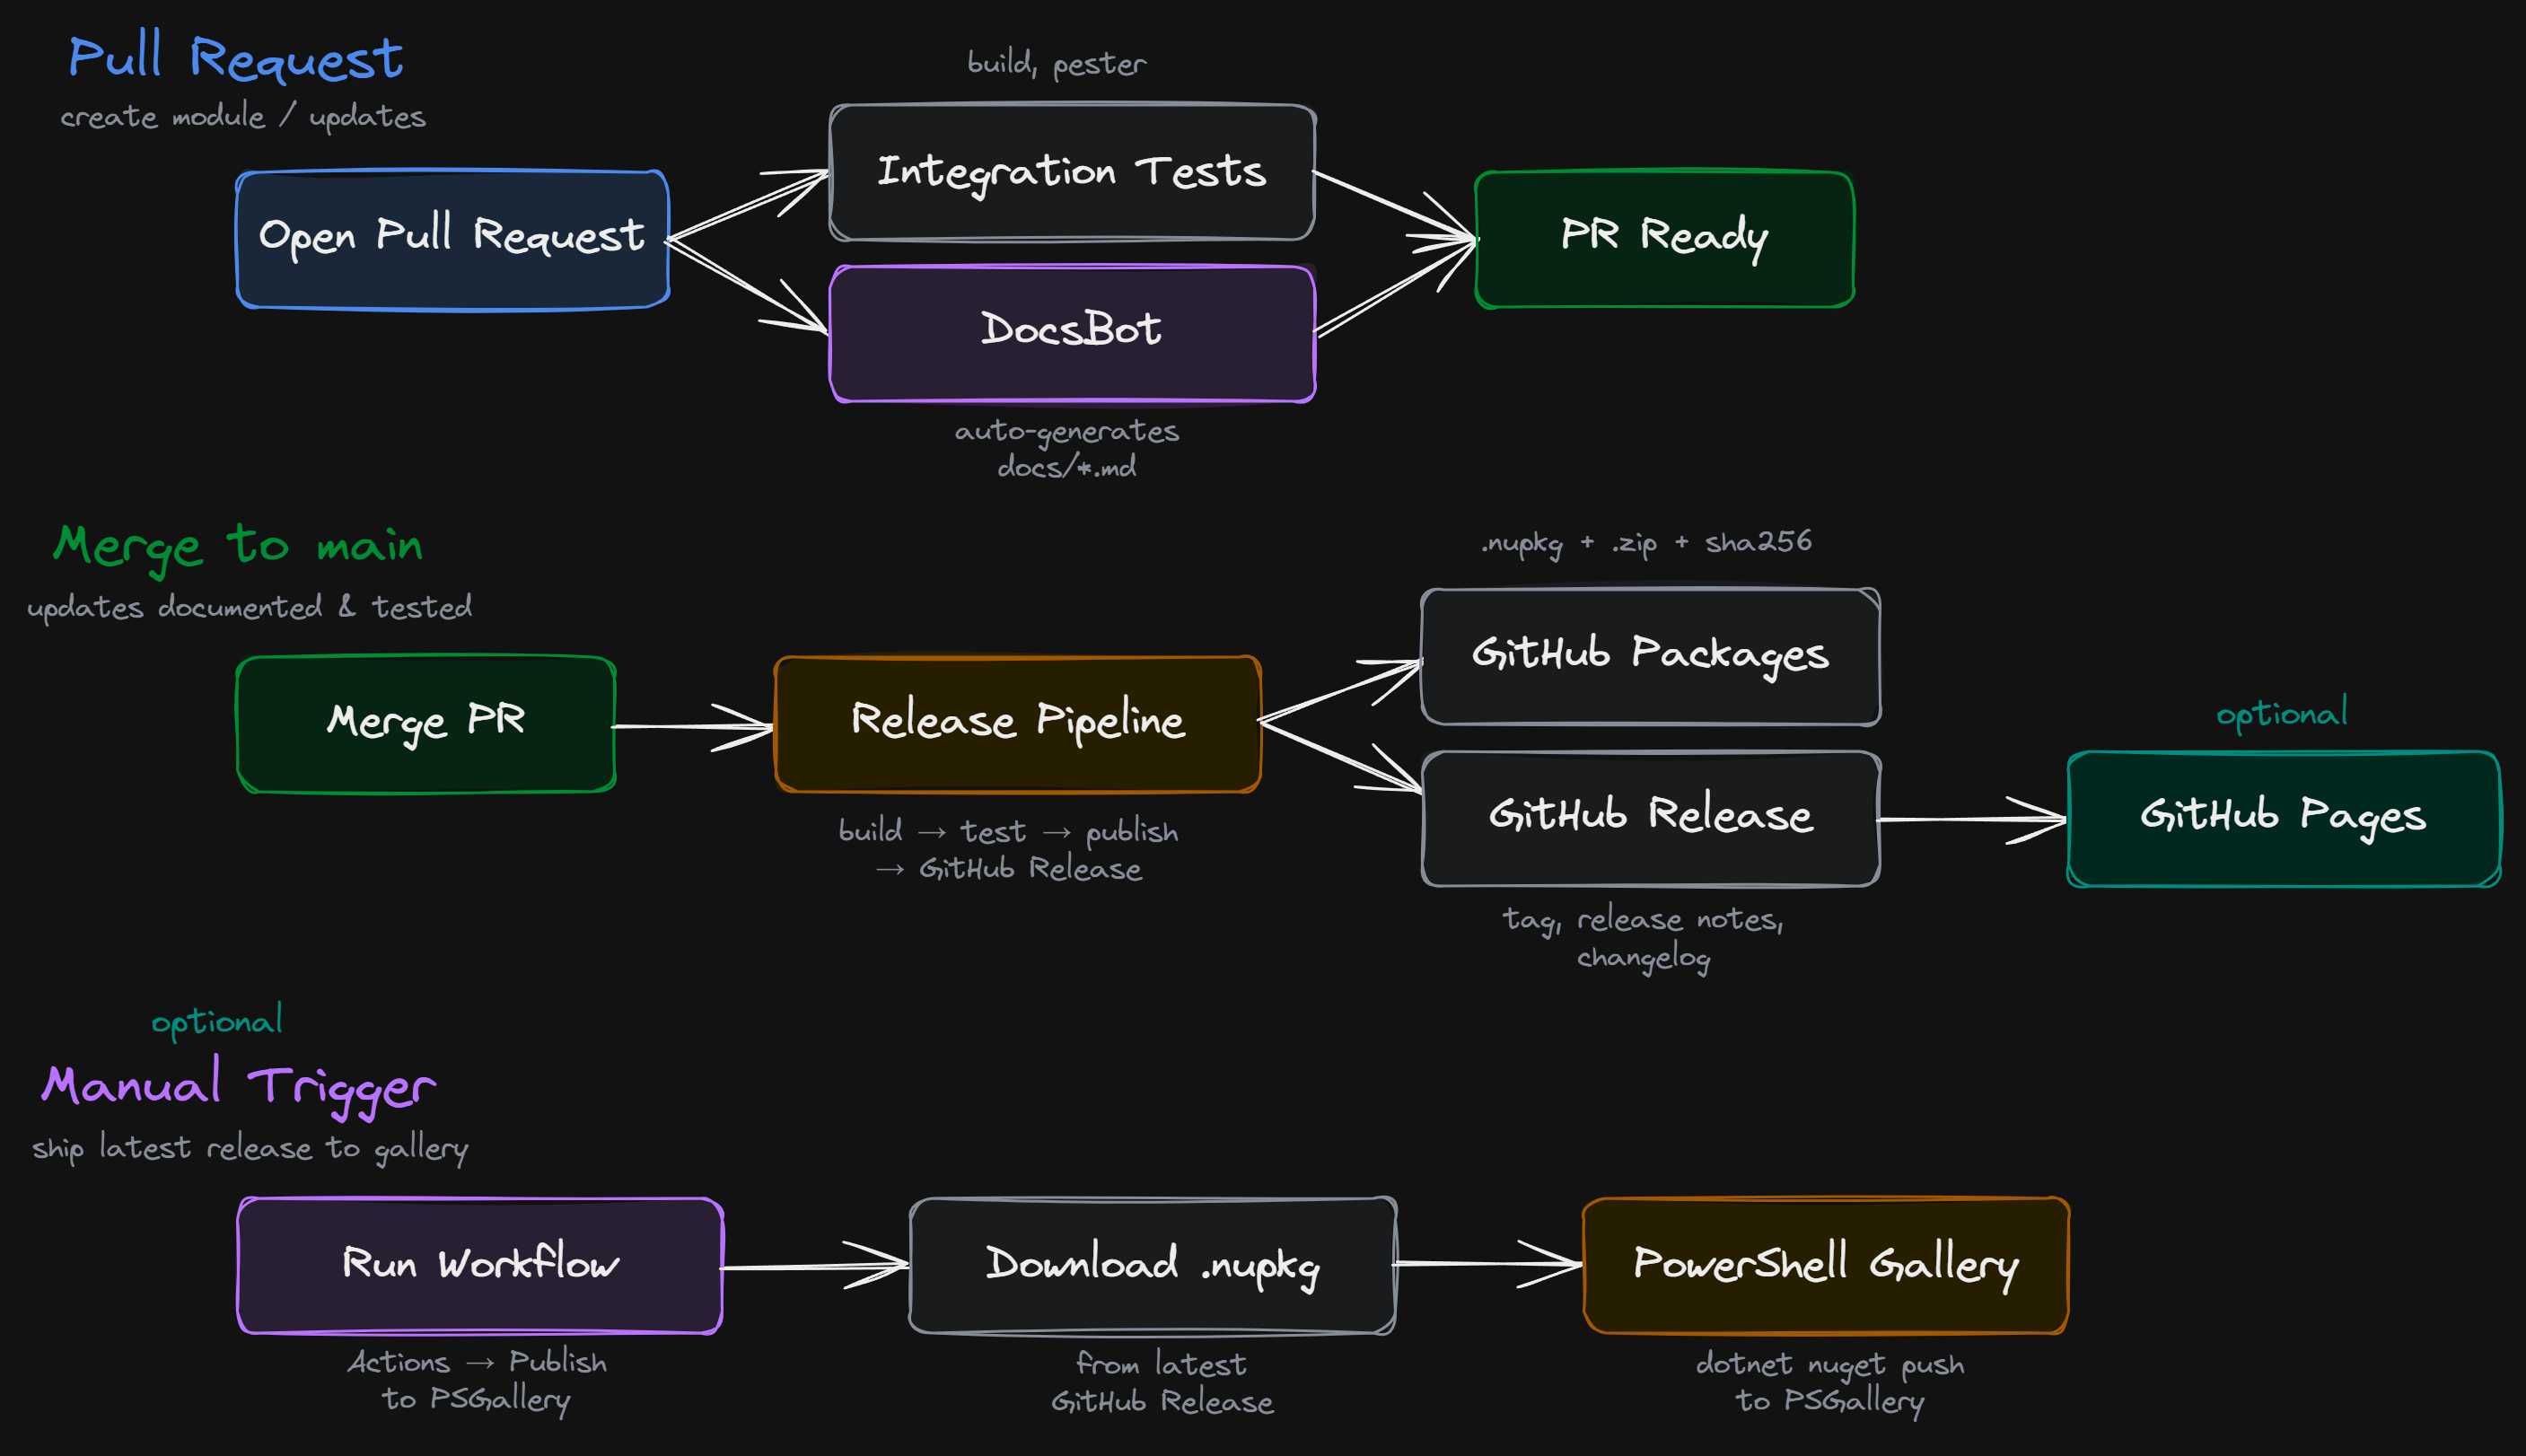
Pull request — opening a PR triggers two parallel jobs: integration tests (build + Pester) and the DocsBot which auto-generates markdown documentation for exported commands. Both must pass before the PR is ready to merge.
Merge to main — merging triggers the release pipeline which builds, tests, publishes to GitHub Packages, and creates a GitHub Release with the .nupkg, .zip, sha256 hashes, and auto-generated release notes. If GitHub Pages is enabled, the site is rebuilt automatically.
Manual publish — the PSGallery workflow is triggered manually from the Actions tab. It downloads the .nupkg from the latest GitHub Release and pushes it to the PowerShell Gallery.
Features
- Pre-configured module structure
- Easy building and testing with make
- Pester testing framework integration
- Dependency management with PSDepend
- GitHub Actions CI/CD workflows
- C# class support
- Enum support with automatic loading
- Argument completer support
- Automatic documentation
- Optional GitHub Pages site generation
Getting Started
Prerequisites
Using This Template
Click the ‘Use this template’ button at the top of this repository to create a new repository based on this template.
Quick Start
# Clone your new repository
git clone https://github.com/OWNER/MODULE_NAME.git
cd MODULE_NAME

# Set up the module structure
make setup
Usage
Setting up your module
This creates a folder with the repository name, housing the module files/folders.
make setup
Installing dependencies
This installs any required modules defined in PSDepend.psd1 at the root of your repository.
If no PSDepend.psd1 file exists, this step is skipped gracefully.
make depend
Perform a build
This builds a nupkg from your source code into the .output folder.
make build
Running tests
This runs all pester tests against the built module.
make pester
Module Structure
The module loads in this order: classes → enums → private → public → completers.
Classes
Defined in classes/ and loaded in the order specified in classes/classes.psd1. Order matters — parent classes must be listed before children. Supports .ps1, .cs, and .dll files.
Enums
Defined in enums/ as .ps1 files and loaded automatically.
# enums/LogLevel.ps1
enum LogLevel {
    Debug
    Info
    Warning
    Error
    Critical
}
Private Functions
Defined in private/, one function per file. Available within the module but not exported.
Public Functions
Defined in public/, one function per file, using the Verb-Noun convention. To export these functions, they must be included in the FunctionsToExport array inside the module manifest.
Argument Completers
Defined in completers/ and loaded last. Provide tab-completion for function parameters. Use an underscore naming convention (e.g. Complete_ParameterName.ps1) — they are excluded from Pester naming and help tests.
# completers/Complete_LogLevel.ps1
Register-ArgumentCompleter -CommandName 'Write-Log' -ParameterName 'Level' -ScriptBlock {
    param($commandName, $parameterName, $wordToComplete, $commandAst, $fakeBoundParameters)

    [LogLevel].GetEnumNames() | where { $_ -like "$wordToComplete*" } | foreach {
        [System.Management.Automation.CompletionResult]::new($_, $_, 'ParameterValue', $_)
    }
}
Dependencies
Module dependencies are managed using PSDepend.
To declare dependencies, create or edit the PSDepend.psd1 file in the root of your repository.
A simple example that installs the latest version of a module from PSGallery:
@{
    'Microsoft.PowerShell.ConsoleGuiTools' = 'latest'
}
You can also pin versions, use hashtable format for more control, or pull from Git repositories.
See the comments in the included PSDepend.psd1 template for all supported options.
Any modules listed in PSDepend.psd1 should also be added to RequiredModules in your module manifest so that PowerShell enforces the dependency at import time.
Custom Scripts
For advanced scenarios that fall outside the standard module build process, two custom scripts are available. These are intended for things like compiling native or foreign-language code, staging external binaries, or configuring specialised environments.
Container Setup
.build/scripts/Invoke-ContainerSetup.ps1
Runs during environment or container initialisation. Use this for installing SDKs, runtimes, configuring environment variables, authenticating with external feeds, or validating toolchain versions before any build steps execute.
Post Build
.build/scripts/Invoke-PostBuild.ps1
Runs after the module has been built to the output directory but before the nupkg is packed. Use this for copying compiled DLLs or native binaries into the output module folder, embedding additional metadata, signing output binaries, or staging any extra assets that need to be included in the final package.
Pipelines
Pull Request
On pull request, the module will be built and tested with the pester tests in your repository. Another runner will execute, producing markdown documentation for exported functions.
Merge to master
Once you merge your pull request, this will carry out the same steps but also release your package. It will produce release notes, changelog and a nupkg in GitHub packages.
Note: this will fail if the version is not bumped, or if the current version already exists as a release or package.
Publish to PSGallery
A manually triggered workflow is available to publish your module to the PowerShell Gallery.
This workflow downloads the .nupkg from the latest GitHub release and pushes it to PSGallery.
To use this workflow:
- Ensure a GitHub release exists with a
.nupkgasset (created automatically by the merge to master pipeline). - Add a
PSGALLERY_API_KEYsecret to your repository or organisation. You can generate an API key from your PSGallery account. - Navigate to the Actions tab, select the Publish to PSGallery workflow, and click Run workflow.
After merge
After merging to master, markdown files for each public function in the module will be created. Ensure Get-Help is accurate and populated, as this will be referenced to create the documentation.
GitHub Pages
This template includes a workflow that can automatically generate a documentation site for your module using GitHub Pages. The site is built from your repository’s markdown files and includes your README as the homepage, exported command documentation, releases fetched from the GitHub API, and any LICENSE, CONTRIBUTING, or CODE_OF_CONDUCT files.
Enabling GitHub Pages
- Go to Settings → Pages in your repository.
- Under Build and deployment, set the source to GitHub Actions.
- Push to
mainor manually trigger the workflow from the Actions tab.
The site will be published at https://<owner>.github.io/<repo>/.
What gets included
The Pages workflow only publishes markdown files (.md), license files (LICENSE, LICENSE.txt), and image assets from the assets/ folder. Everything else in your repository (source code, build scripts, tests, etc.) is excluded.
Favicon
To add a favicon to your site, place an SVG file at assets/favicon.svg in your repository.
How it works
The workflow dynamically generates the site at build time — no Jekyll configuration files need to be committed to your repository. It detects which community files exist (LICENSE, CONTRIBUTING, CODE_OF_CONDUCT) and conditionally adds them to the navigation. If GitHub Pages is not enabled, the workflow skips gracefully without failing.
Contributing
We welcome contributions! Please see CONTRIBUTING for details on how to contribute to this project.
License
This project is licensed under the Apache 2.0 License - see the LICENSE file for details.
Copyright (c) 2026 James D’Arcy Ryan
Author
James D’Arcy Ryan
- GitHub: @jdarcyryan
Acknowledgments
Thank you to all contributors who help improve this template!